
How to Do Tubular Bind-Off in the Round Without Warping
I’m a big fan of tubular bind-off, but I’ve noticed that my favorite online references for how to do it are all missing something. While they explain the actual process of the bind off, I’ve never seen anyone address a problem I frequently have when trying to work tubular bind-off on a small circumference in the round (particularly sleeve cuffs, although I’ve also had this problem with some necklines). What I find is that, because you need to split all your stitches onto two parallel needles, when working in the round you end up stretching the first and last stitches of the round very far apart, often in a way that makes the stitches look warped after you’re done (particularly if you are doing the bind off on a 2x2 rib which involves even more stitch manipulation). It’s also often really difficult to just work with the stitches when a small cuff is arranged this way, which makes tubular bind off more frustrating and tedious than it needs to be.
The solution is easy: don’t work the entire bind-off at once, work it in two sections!
I’m sure I’m not the first person to come up with this solution, but because I haven’t seen it online, here is a tutorial on how I do it. Note: this is not a tutorial on how to actually do a tubular bind-off or kitchener stitch, for that I would refer you to this very nice tutorial from Shibui Knits for 1x1 rib and Ysolde Teague’s tutorial for 2x2 rib .
1. Work any setup rounds called for your type of rib (in my example, I have 2x2 rib so I had to do the row where you rearrange the stitches to 1x1). Cut your yarn with a tail long enough for the bind off.

2. Using 2 double-pointed needles (dpns), evenly distribute the full round of stitches so you have EXACTLY the same number of stitches on both needles (this is important to make this method work). NOTE: This is NOT the round where you slip all the knit stitches to the front needle and all the purl stitches to the back needle – you are simply putting the first half of the stitches on the first needle and the second half of the stitches on the second needle.

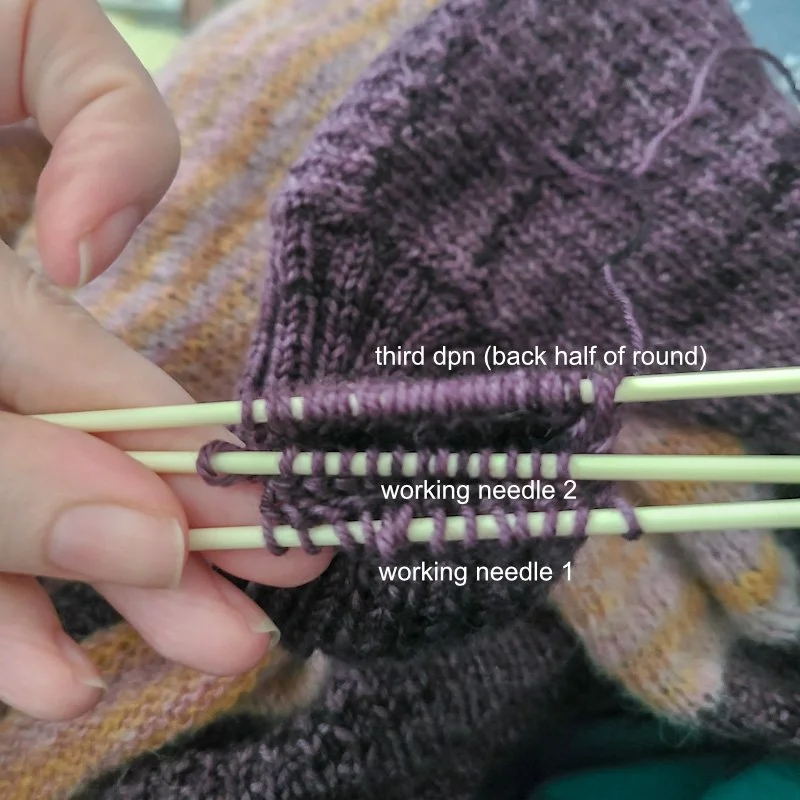
3. Using 2 additional dpns, you will NOW alternately slip the knit stitches to the front needle and the purl stitches to the back needle, but ONLY for the first half of the stitches in the round. You will now have three dpns – two that have the first half of the round set up for tubular bind off, and then the third needle with the second half of the round. This third needle is effectively a stitch holder while you work with the front half of the round. We will call the two dpns that you are actually using for tubular bind off the “working needles” from now on.
4. Begin working the tubular bind off using your yarn needle and the two working needles.

5. Work the bind off until there is one stitch on each of the working needles. You will have just sewn through each of these stitches once (in order to drop the stitches in front of them off the needle).
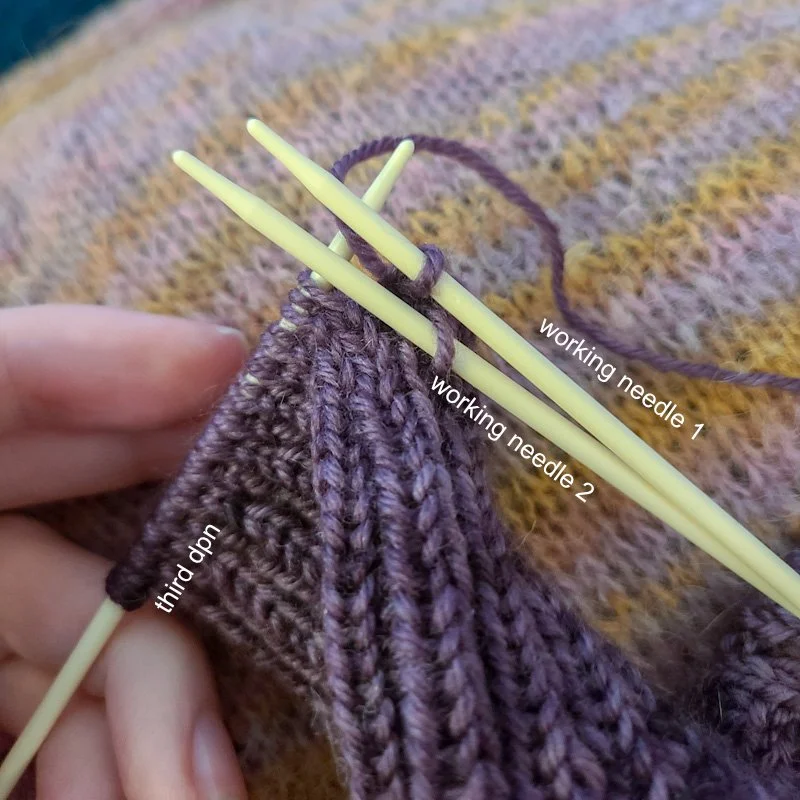
6. Distribute the back half of the stitches from the third dpn to the two working dpns, again slipping the knit sts to the front and the purl sts to the back needle (the stitches from step 5 will be the stitches furthest to the right once all the stitches are distributed). The third dpn rotates around to become your left hand needle, and the two working needles are in your right hand. Slip all the sts off the third needle and set it aside.

7. Work the remaining stitches in tubular bind off as normal. When you drop the final stitches off the needles, you should see that there is a minimal amount of stretching or warping between the first stitch in the round and the last one.

It’s a little tricky to explain with so many needles floating around, but do it once and you’ll see how simple it really is to make your tubular bind offs in the round not only easier to do, but to make them look so much neater.
Have you seen this tip before? Is it something you think you’ll try in the future? Let me know in the comments!
I’m Whitney, a tech editor, graphic designer, and lifelong crafter. Join me for an exploration of my latest knitting, crochet, sewing, and upcycling projects, tips on knitting technique, editing tips for knitting designers, and more!