
Mending Lab: Testing out Sashiko Embroidery, Part 1
Welcome to Mending Lab! In this series I explore techniques for mending and/or upcycling clothes and/or fabric housewares. While we’ll focus mostly on visible mending techniques, we’ll also look at simple alterations that can upcycle an item you never wear or use into one of your favorite possessions.
I’ve been fascinated by sashiko embroidery for some time now. The graphic designer in me appreciates the geometric designs, and the DIYer in me loves the idea of using sashiko as a visible mending technique. So I made it the very first item on my 2025 Crafting Goals list, in an attempt to hold myself accountable for actually assembling the materials and knowledge I needed to give it a try.
For my first attempts, these are the materials I used:
Learning materials:
Essential Sashiko from Boutique-Sha. This is an English translation of a Japanese sashiko instruction book (Sashiko No Monyo To Komono). I purchased my copy from Red Hen Craft Books’ online shop where it no longer appears to be in stock, but you can get it through Bookshop.org. (Disclosure: that’s an affiliate link, and I do get a small bonus if you purchase.)
I also found the blog posts at Upcycle Stitches very helpful. This is a website from sashiko artists who offer both classes and supplies. I particularly found this post on sashiko thread helpful when I was trying to figure out what to buy and whether my first idea for a project would even work (it wouldn’t, more on that shortly).
Supplies:
I was able to purchase my supplies from my local embroidery shop, Maydel, but they do ship across the US and internationally if you don’t have a store near you with appropriate supplies.
6 skeins each of Olympus sashiko thread in ultramarine blue (#23) and hot pink (#21)
1 pack of Daruma kogin needles (2 needles)
Water erasable fabric pen
A note about supplies – if you’ve never tried sashiko before, it’s highly unlikely you have the right type of thread and needles on hand even if you have done a lot of other types of embroidery or hand sewing. I recommend reading the post linked above for a thorough explanation of why using sashiko thread is best if you’re trying to achieve the original purpose of sashiko, which is to mend and/or strengthen fabric. Sashiko needles are also much larger than standard embroidery needles because of the technique of loading multiple stitches on the needle at once, which you’ll see later in this post. If you really want to give it a try with a full strand of embroidery floss and your largest needle before you buy anything new you can, but I’m not sure you’ll get quite the same experience or final outcome.
My original thought, before I’d done any reading, was to tackle mending my favorite summer dress, which had developed many small holes after several years of heavy wear. However, this dress is made of jersey knit, and sashiko is designed for woven fabric (as the designs are meant to help strengthen the warp and weft of the fabric). So I set that aside for a different project and decided to make use of the remaining scraps of the bedsheet I upcycled into pajamas . Not only was this a nice woven linen, but it was linen that had become very threadbare, so it offered a good chance to see if sashiko could help extend the life of this fabric.
The Essential Sashiko book offers several simple sewing projects to use as practice, one of which is a simple drawstring bag – I LOVE drawstring bags for craft project storage (I have a hanging rack on my wall in my craft room to hold them all), so this seemed like a good, practical project. I did decide to make it a little larger than the 8x10” bag in the book and increased both measurements by 50%. After cutting my fabric to the size rectangle I wanted and ironing it flat, I was ready to start the embroidery …. except I needed to get my chosen designs onto the fabric.
Now you may have noticed that my supply list did not include carbon transfer paper, iron-on transfers or any of the other materials that would help transfer the embroidery design directly to the fabric. I haven’t had great luck with carbon transfer on fabric in the past, and I didn’t really want to buy the kind of transfer templates that might only be usable for one project (or if reusable, always had to be the same scale and shape). I tried three different methods for transferring the designs to my fabric, all of which worked to a certain degree, but one which I definitely preferred.
Method 1: Direct Tracing

You can just see the black lines of the book diagram through the fabric.
Since my linen was light colored and very thin, I suspected I could just lay it over the motifs in the book and trace from there. This did prove true, although I did end up trying several different tracing tools. One of the biggest issues was that the weave of the fabric made it difficult to trace a continuous line without snagging. This eliminated pencil as a viable option. I did manage to get a fabric marking pen to work by dotting the lines out rather than trying to trace a continuous line. However, initially the only marking pen I had on hand was labeled as “air and water soluble” – I’d used this successfully on felt projects before, but those were projects I could complete very quickly. As you’ll see this didn’t end up being the BEST option for a project that I needed to work on over multiple days.
I tried to follow the instructions in Essential Sashiko as best as I could (again, highly recommend this book or one like it – sashiko has several techniques that differ from embroidery techniques I’d learned in the past, and the tips in the book were very helpful). In sashiko, you load multiple stitches at a time onto your needle (sometimes the entire line if it’s short enough), which cinches the fabric; then you pull the thread through and smooth the fabric back out with your fingers. Since sashiko is essentially just a running stitch and you’re working on one line at a time, this is easily done. Per the book’s instructions, I sewed over the design in a modular fashion, reversing the direction of each new section so the fabric wouldn’t warp.


As I feared, the air soluble stitches only remained visible on the fabric for a few hours - as evidenced by that first photo above. Luckily I was able to get enough stitch lines down before they disappeared that I could easily line up the design on the book to retrace it once I got my hands on a proper water soluble marker (that’s why the marker lines are blue in the 2nd and 3rd photos). The water soluble marker was also more of a felt tip which allowed me to actually draw lines. This method worked fine overall, although it was tricky to hold the correct page of the book flat enough while also keeping the fabric from shifting.
Method 2: Air soluble grid, water soluble stitch pattern

The already half-disappeared air-soluble grid (purple ink), and the first block of the stitch pattern (blue ink).
Essential Sashiko does offer traceable motifs if you’re doing one of their included projects, however, the majority of the book is a catalog of 92 different popular sashiko patterns, illustrated on grids. This inspired me to test a couple of methods for applying a grid to my fabric and then tracing a pattern directly on the grid. I scaled my grid at ½ inch square for the grid squares and 6 inches square total.
My initial idea was to trace the grid with the air soluble fabric pen, then draw the actual stitch pattern over it with the water soluble pen. I thought this way the grid would fade and not get confused with the stitch lines. I used my clear fabric ruler from my rotary cutter set to help me keep the lines straight – unfortunately the ruler seemed to speed up the fading of the air soluble pen any time I covered an existing line with the ruler to trace the next one (I’m guessing the friction from the plastic dried it out?). However, because I was doing a very simple pattern, there were enough grid marks visible to quickly get the pattern filled in before it disappeared entirely.

As you can tell, the purple ink faded very fast, but I was able to get the entire pattern drawn before it disappeared entirely.
Method 3: Water soluble dot grid

I did attempt to do another purple grid first which is why you can see a little purple ink in this photo.
I decided to switch to using only the water soluble marking pen, but I didn’t want to trace a full grid and risk confusing the actual pattern stitch lines with the grid lines. So instead I made dots at every half inch mark. This was enough of a guide to easily trace a pattern – however for this second pattern, which featured curved lines, I had a lot harder time drawing it accurately.

Not my best drawing work, certainly.
You may also notice that the scale of this pattern is much larger – this is because the curves map out on the grid over two squares each, where each end of the “pluses” on the first pattern were only one square. I probably should have scaled this pattern to quarter inches, but for a learning sampler project it’s fine. I do think this is the method I will use for transferring patterns going forward, as it was both the fastest method for getting the grid applied and the only one where I didn’t have to stress out about disappearing lines.
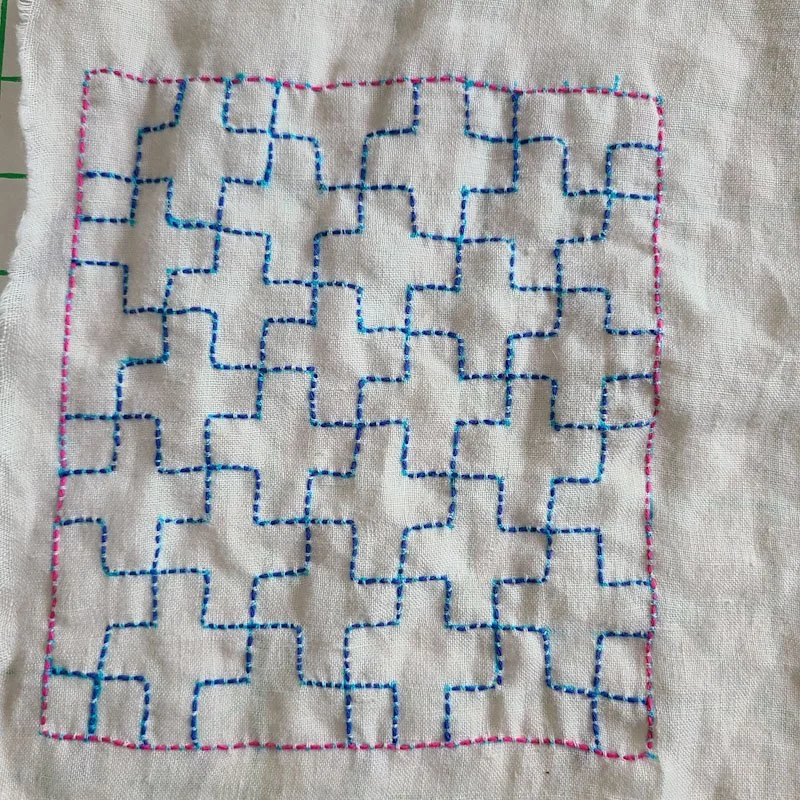
I have at this point, finished both of the straight stitch patterns. I can’t wash the fabric pen out yet, but I’m pretty happy with how they are coming along!

In part 2, we’ll tackle curved lines for the first time, finish the project bag, and talk about some of the surprising things I’ve learned about sashiko from this initial project. I do think I feel a new crafting obsession coming on!
Have you ever tried sashiko mending? If you haven’t, did this post inspire you to start?


I’m Whitney, a tech editor, graphic designer, and lifelong crafter. Join me for an exploration of my latest knitting, crochet, sewing, and upcycling projects, tips on knitting technique, editing tips for knitting designers, and more!