
How Garment Construction Affects your Ribbing Instructions

In this series we do a deep dive into items I check for in every pattern I edit, the most common issues I see, and how to correct for them.
When I get a new garment pattern to tech edit, the very first thing I make note of when reading through it is how it is constructed, especially if there is either a textured stitch pattern or repeating colorwork involved. I do this because, when I’m dealing with a repeating pattern, I have to check that repeat differently depending on whether the pattern is happening in the round, on flat pieces that will be seamed, or in one of the more complicated “seamless” constructions that are currently popular.
One of the easiest examples of how stitch patterns are affected by construction is in ribbing, so that’s what we’ll focus on today. If you’re a knitwear designer tackling a new-to-you type of construction or a maker trying to add ribbing to a pattern (or change the ribbing called for in the pattern to a style you like better) you may not realize how your pattern math needs to change to accommodate these different constructions. So let’s talk through some of the basic ways in which ribbing repeats are dependent on garment construction.
Ribbing in the Round
If you’re knitting K1, P1 or K2, P2 ribbing for the cuffs, waistband, and/or neckbands of your garment in the round, it’s a pretty easy calculation – you want a continuous repeat, so your stitch count needs to be either divisible by 2 (for K1,P1) or by 4 (for K2,P2) so your round always ends at the end of a repeat. Sometimes if the body or sleeve of the piece has a stitch count that isn’t divisible by 2 or 4 you’ll need to work a setup row to adjust to an appropriate stitch count, but this is by far the simplest method for ribbing.
This calculation changes if you’re working flat, and *how* it changes depends on *why* you’re working flat.
Ribbing Flat (not-seamed) or in the Round but Steeked
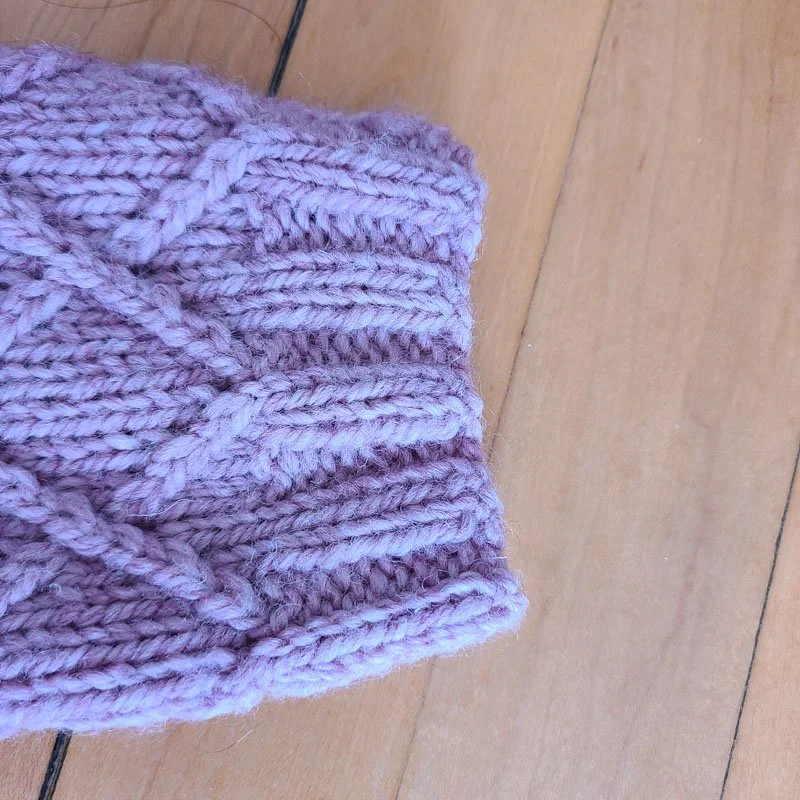
If you’re working on a cardigan, the ribbing at the waist edge is either going to be worked flat, or in the round and steeked. In most cases, it will look best if the front edges mirror themselves -- if you start K1,P1 ribbing with K1, you also want it to end on a K1. This means that for K1,P1 rib you’d need an odd number of stitches so you can tack that extra K1 on at the end.

This particular cardigan has an extra detail along the edge, but you can still see how the two front edges mirror each other.
If you are working K2,P2, the calculation is a bit more complicated and needs to come out as a whole number in the following formula.
(Total stitches – 2)/4
In this case, you need two extra stitches to make that last K2, but the remaining stitches would still need to fit evenly in a four stitch repeat.
If you are planning to steek your cardigan, you would make similar calculations as above, but you’d also have a few extra knit stitches between those mirrored edges to form the cutting area for the steek – make sure you also subtract those from the total stitches before dividing by the number of stitches in the repeat!
Ribbing Flat and Seamed
The calculations change *again* if you’re working a waistband for a garment that’s knit flat in pieces and then seamed. For seamed garments, the rule of thumb is that you lose one edge stitch on each side of the piece being seamed. So for a continuous repeat, you would want one extra stitch on each side of the piece. In most cases, this would be a knit stitch no matter what rib pattern you are using, just because knit stitches are a little easier to seam in mattress stitch. So the row for K1, P1 rib instructions might look something like:
K2, (P1, K1) X times, K1.
For K2, P2 rib, you could use a setup similar to the flat cardigan, where you end on K2 on each end of the row. This is because when sewn together, each of those edge K2s will lose one stitch, leaving you with only a K2 column visible and a perfect continuous repeat.

Photo of k2,p2 rib on a seamed sweater from the underside.
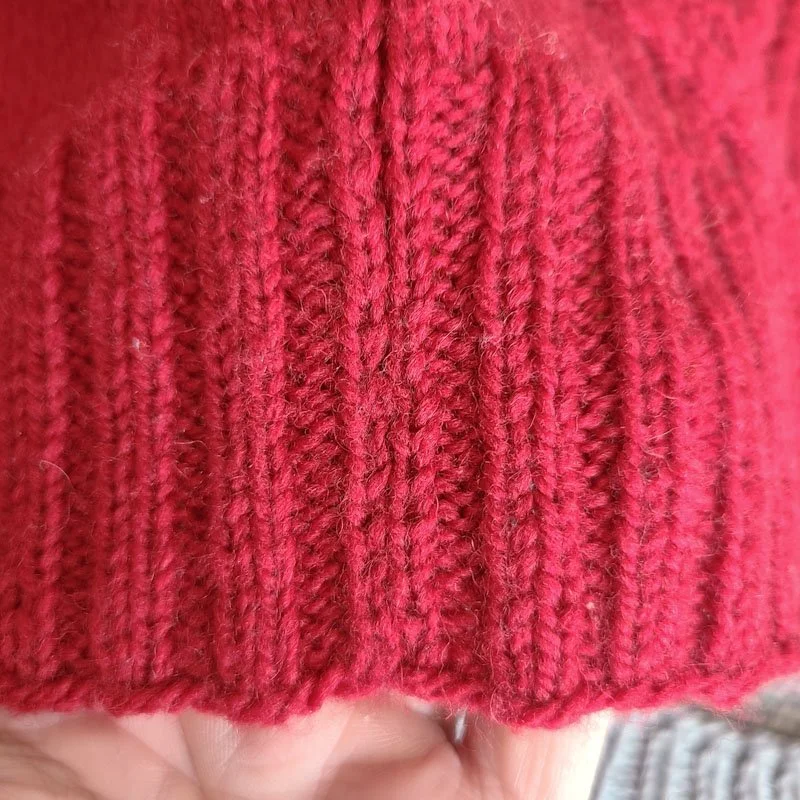
Here, from the right side, you can see how the K2 columns, once seamed, form an almost invisible repeat.
So the formula for these would be
(total stitches – 3)/2 for K1,P1 or for K2, P2 (total stitches – 4)/4.
You may be wondering why, knowing that the designer added one stitch to each side of the row, I didn’t just write the same formula as the previous example: (total stitches – 2)/[2 or 4]. As a tech editor, one of the ways I check for errors in a pattern is by calculating to the row instructions as closely as possible. For K1, P1, the instructions say there are 2 stitches at the beginning, followed by a 2 stitch repeat, and then there should be 1 stitch leftover at the end. So for the instructions to work, after those 3 edge stitches are removed, the remaining stitches need to be divisible by 2. More than once I’ve found a typo where the designer wrote down the correct number of total stitches but miswrote the instructions as K1(P1, K1)X times, K1 or K2(P1, K1) X times, K2 – checking the instructions this way helps me spot that.
After looking at those ribbing examples, we have some basic points to keep in mind for in the round construction repeats vs. flat construction repeats:
If it’s in the round – the repeat should fit evenly
If it’s flat and not seamed (or in the round and steeked) – in most cases the ends should mirror each other, so you’ll likely need to add extra stitches on one end.
If it’s flat and seamed – there should be an extra stitch on each edge that is going to be seamed, and then the repeat should fit evenly on the remaining stitches.
I hope that this look at how ribbing repeat calculations change helps you understand how garment construction choices impact even the simplest stitch patterns. These guidelines can also work for larger stitch repeats or colorwork on the body of a garment, although there are other variables that can change these rules a bit (the compound nature of checking repeats on a garment where front and back shoulders are knit separately and then joined to knit the body in the round could be an entire series of posts)
Do you have questions about these calculations? Would you like me to dive into more complex stitch pattern repeat constructions in the future? Let me know in the comments!