
Terms You Need to Know When Doing Your Own Graphic Design Part 1: Text and Printing Terms
If you run a small craft business, you may also be doing all your own graphic design. But if you’re learning as you go, you’re probably running into tutorials that are aimed at experienced graphic designers and are filled with terms you might not understand. Whether you’re trying to choose a graphic design program or you just want to know what a “bleed” is, this series will explain common elements of graphic design and how they are used.
Today we start with the terms that are important to multipage documents, including knit and crochet patterns: text flow, tables, PDF exporting, and printer’s marks.
Text flow
When you’re typing in an ordinary Word, Pages, or Google Docs document and get to the end of one page, the text automatically goes to the next one. If you go back and delete text from page 1, the text from page 2 automatically shifts back to page 1 if there’s space. This is text flow – a function a lot of us take for granted but which isn’t necessarily present in every graphic design program. Canva, for example, does not currently have this feature, nor do most vector illustration programs (such as Adobe Illustrator). If you choose a graphic design program without text flow, you will have to manually move text between pages as you edit.
Programs with text flow are usually a type of program called “desktop publishers,” like Adobe InDesign, the Publisher mode of Affinity Creative Suite (which is free with a Canva account), or the open-source desktop publisher Scribus. In these programs you commonly create text boxes which you then link together to specify the order in which you want the text to fill those boxes. This is how magazines create layouts where they have photos or pull out quotes inserted in the middle of a longer article:
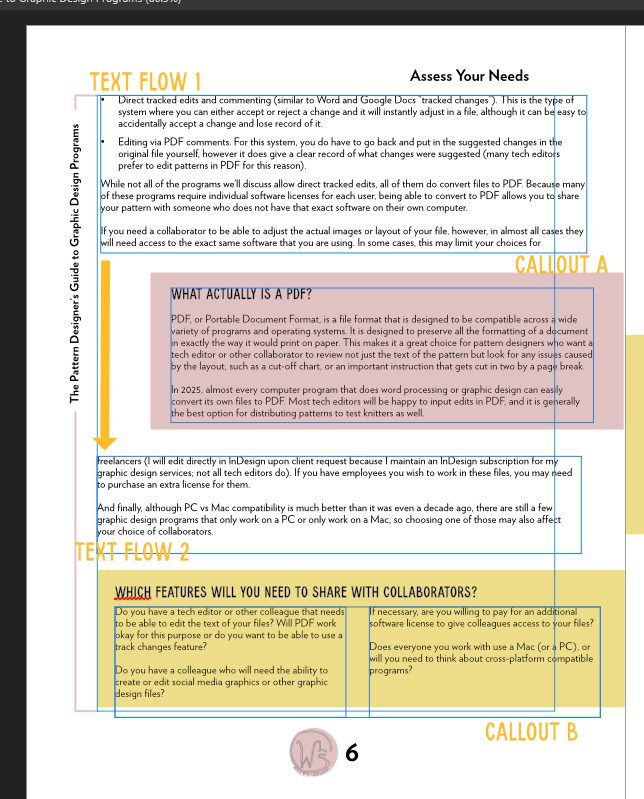
This sample page shows two text boxes featuring the main article text interspersed with call out boxes.
If you design multipage knit or crochet patterns or want maximum flexibility with how you arrange the text of your pattern instructions, you will benefit from a program with text flow. If you design simple, 1-2 page patterns or are only looking for a program to help you make graphics for your social media or website, text flow isn’t as crucial.
Tables
This is a feature that can be very important to knit and crochet pattern designers. Pattern designers use tables for size charts, yarn yardage charts and, increasingly, to organize pattern instructions. Most graphic design programs will at least allow you to import a table that’s been converted to an image file, which is a good workaround if your chosen program can’t make tables, although it can be annoying if you later need to fix text in just one cell.
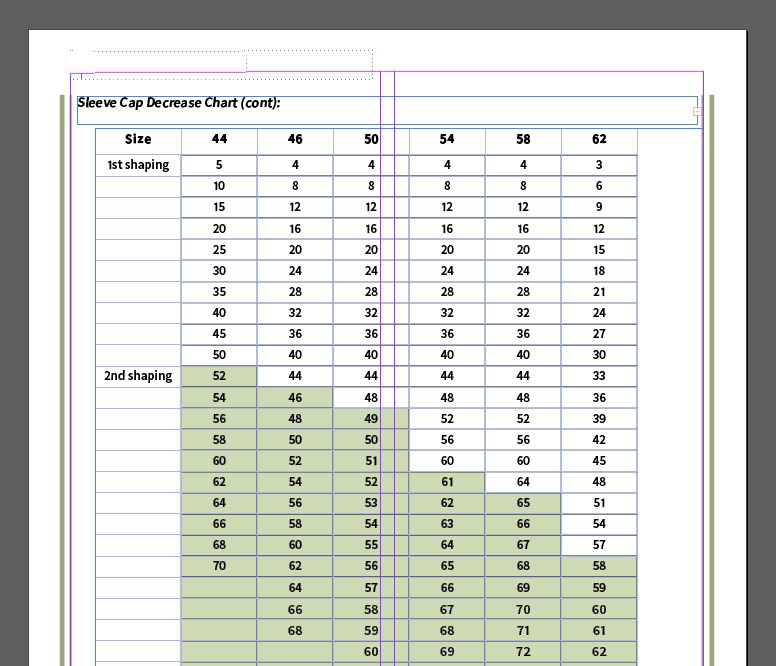
A sample table showing sleeve decreases placed in an InDesign layout file.
However, a wide range of graphic design programs allow creation of tables directly in the program – this can be found in any desktop publishing program, but can also be found in many of the more basic graphic design programs, like Canva. One quirk with tables is that the customizability of the table’s design (fonts, colors, etc.) can vary wildly from program to program, both in terms of how much you can customize them and how easy it is to do. If you want a specific table format in your patterns you may want to test out the program you’re considering first and make sure you can create a table with the formatting you want.
Printer’s Marks
Many pattern designers do not need to be able to produce a professional quality print version of their pattern, because they only sell digital PDFs online. However, if you do want to print your pattern on paper -- or if you are designing marketing flyers, postcards, printed packaging or anything else that needs to be printed out -- the printer you work with may ask for a file with either “printer’s marks” or “crops and bleeds.”
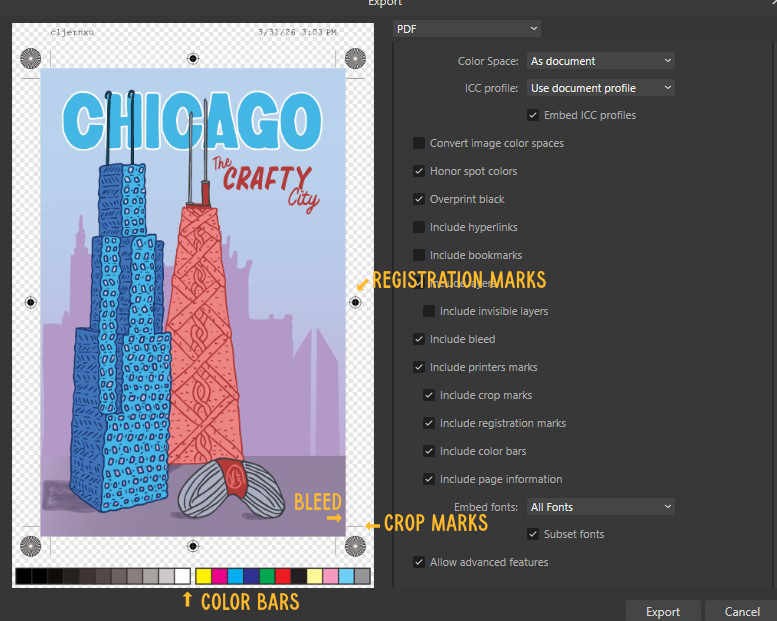
A sample of the printer’s mark options when exporting to PDF from Affinity.
No printer, no matter how fancy, can print all the way to the edge of a piece of paper. If you’re printing a design that has ink all the way to the edge, your printer will need to have a little extra space around the edge of the design (the bleed) that they will then trim off at the crop marks (small cross hatch lines which show where to trim to get the intended size). Commercial printers will usually tell you how big they need the bleeds to be and whether or not they need the crop marks included. For offset printing, which requires multiple passes of the printer, a printer may also ask you to include registration marks, which help make sure each color pass of the printer is accurately aligned.
Most established graphic design programs (including Canva, Adobe, and most of the major open source programs) will include an option to export your final file with your choice of printer’s marks (although keep in mind that if you need bleeds, you are often asked to set those up when you start a new file). However, if you do any print products it’s still a good thing to double check when you’re looking at programs.
Doing your own graphic design can be overwhelming but learning common terms and features of graphic design programs can help you feel more confident in your projects. And of course, if you come across something you need a professional graphic designer for, why not see if I can help?
I’m Whitney, a tech editor, graphic designer, and lifelong crafter. Join me for an exploration of my latest knitting, crochet, sewing, and upcycling projects, tips on knitting technique, editing tips for knitting designers, and more!